How to get the perfect photograph at Lower Antelope Canyon
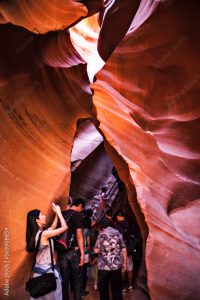
You’ve made it! You have finally arrived at the amazing Antelope Canyon on the Navajo Nation. The slot canyon is one of the most photographed places on Earth, and you have been waiting for your own guided tour for months to finally see it with your own eyes.
You’ve got your water, closed toed shoes and sunscreen. But you haven’t forgotten the most important thing – your camera. Whether it’s your personal camera or smartphone, you know that you can’t leave Lower Antelope Canyon without that perfect shot. That one amazing photo that reminds you of the professional photos you see on the internet of Antelope Canyon, but is one you can say to your friends, “yeah, I took that.”
But you are likely not a professional photographer, and you may not be carrying a massively expensive professional camera into the slot canyon with you. Can you still get that perfect photo?
Yes! Here are some simple, easy tips to make sure you are able to bring home photos of Lower Antelope Canyon that will last a lifetime.
Turn off the Flash
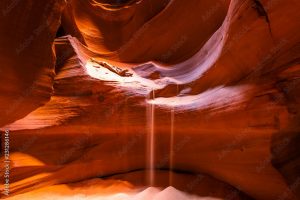
First and foremost, you will be visiting one of the most beautiful displays of natural light in the world when you visit Lower Antelope Canyon. Why ruin it with the artificial light from your flash?
The truth is, it is extremely rare to find a great smartphone or camera photo that is taken with a flash. They make the subject overly whitewashed, alter colors and can fade out some of the most important parts of the picture.
This is especially true in Antelope Canyon, where the natural sunlight cascading down through the slot canyon is integral to what makes the place so unforgettable to begin with.
Set the exposure manually
Again, because the natural sunlight of Antelope Canyon is critical in getting that perfect shot, you’ll want to manually set your exposure to make sure it’s just right. When your phone camera turns on, for example, it often will automatically adjust to preset settings on how much light to let in. This may or may not be the right setting to perfectly capture the natural sunlight (which changes throughout the day as the sun rises and sets over the opening of the canyon). It’s best to adjust it manually.
When you open your camera app, wait until you see the lens begin to refocus. You should see a small sun icon and a vertical scale. Slowly swipe your finger up and down this scale to adjust the light level.
Hold the camera or smartphone still
Tripods are not allowed to be brought into Antelope Canyon, so this one can be a little tricky. But it is still important.
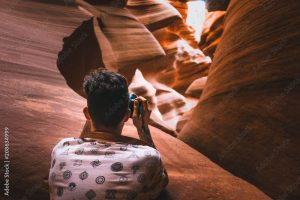
Smartphone cameras in particular are sensitive to movement, and for a place with so many grooves and ledges naturally carved into the rock, with fine texture virtually everywhere, the last thing you want is for anything to be blurry. You’ll want every detail to be sharp and in focus.
It’s not as hard as it sounds, even if you don’t have the steadiest of hands. You can lean on a friend or the canyon wall. There are also some ledges along the canyon that are perfect for propping up your camera. There’s also rocks and sticks you can use as support if need be.
Placing the camera on the ground is not generally recommended because the floor of the canyon is fine sand – which can get inside your phone or camera. But placing the camera over say a cloth or flat surface on the ground should be OK, especially if you are looking to get a shot of the rising canyon walls, or even the openings at the top where the sun shines through.
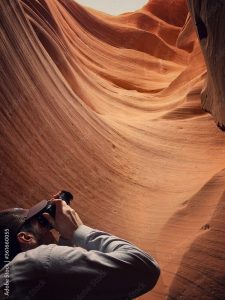
Play with angles
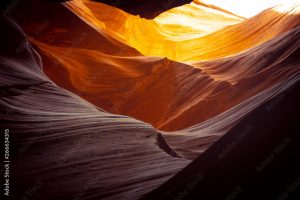
One of the many fascinating aspects of Antelope Canyon is how dramatically the colors, shadows and reflections of the slot canyon can change with just the slightest movement or different angle.
So don’t just settle for one shot, especially one that is little more than a straightforward, two dimensional shot. Try all kinds of different poses and viewpoints. Look up from the canyon floor. Look through canyon crevices. Look down from the top at the people just below before you climb down the ladder. There are seemingly countless ways to capture your subject (or you) besides what is standing right in front of you.
Taking photos from a unique angle can make them truly stand out, especially those taken from above or below. They have a more three dimensional feel, and even create more dramatic depth, or height, with the subject.
Again, Antelope Canyon’s natural sunlight is key, and changes throughout the day, and throughout the seasons. In fact, during the winter months the hues of the canyon walls often bring out more purples, blues and pinks – instead of the standard oranges and reds we are used to seeing in the summer.
Antelope Canyon is one of the most photographed places on earth for good reason. The natural sunlight reflecting off the canyon walls are some of the most extraordinary images ever captured on film. But the true beauty of the canyon is those images, lighting and textures can change significantly with just the slightest adjustment. Moving one foot to the left or right, crouching down just a little further, holding the camera at just a slightly different angle – all can completely change the nature of the photo.
Every crevice of the canyon reflects sunlight differently, and the sunlight itself changes as the sun moves across the sky throughout the day – creating millions of different possible images. So don’t just settle for a single angle or shot. Take multiple shots at multiple angles, even the slightest change in lighting can make a dramatic difference in the reflection on the walls of Antelope Canyon.
Dont zoom in
If you need more detail, walk closer to the subject, or just take the photo from a distance and blow it up later on. That way you never compromise quality and leave Antelope Canyon with a blurry picture.
Landscape orientation is preferable
While both landscape and portrait juxtapositions on your camera or smartphone should be used to experiment with different angles and shots, generally landscape should be used more frequently. Landscape tends to capture more of the curves, shadows and colors of slot canyon than portrait mode, due to the walls of the canyon being very tall and relatively close together. In other words, it is better to have a wide shot than a tall one.
If bringing a camera instead of a smartphone, a wide angle lens is recommended. Keep in mind that Lower Antelope Canyon does not permit an interchangeable lens while on tour, simply due to the dust and sand that is present in the canyon that can ruin your camera.
Use the canyon’s negative space
“Negative space” is simply a fancy way of saying empty space, large parts of the photo with nothing really to it – such as a blue sky, a grassy field, the ocean or a large wall. Fortunately, Antelope Canyon has quite a few large walls.
Use leading lines
“Leading lines” is another fancy photography term. It simply refers to lines within a photo that draw – or “lead” – the viewer’s eye towards a particular point. For example, roadways, buildings or even horizons. Leading lines can be straight or curved, they can take the viewer’s eye wherever they want.
In case you’ve never seen a photo of Antelope Canyon, there are leading lines practically everywhere. Years of weather and water erosion into the sandstone have made these lines incredibly intricate and part of what makes Antelope Canyon the tourist attraction it is today.
Don’t forget the little things
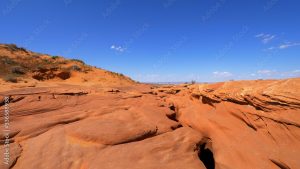
Antelope Canyon is literally defined by its unique texture, sandstone carved and shaped by the elements for countless centuries. The details of the walls, the ridges, even the floor tell the story of this ancient landmark – a unique natural treasure slowly crafted over millennia by nature itself.
In other words, it’s the little things that matter. Intricate details of ancient natural landmarks make for great visual content. You’d be surprised how much impact something as insignificant as a small rock or stick can have on your photo.
For example, when you are taking a photo near a ledge within the canyon, take a handful of fine sand and place it near the edge or on top, so that it slowly drifts down like sand in an hourglass. Photos that show the sand gently falling in the foreground of where the subject is standing can be incredibly impactful – as though you are touring the canyon while nature itself continues her evolutionary sculpting.
To make sure you capture these tiny details, be sure to use the “sharpen” tool in your favorite photo editing software, or photo filters that are available to you.
Along these lines, nearly all recent cameras and some smartphones – both android and iPhone – will allow you the option to shoot RAW or DNG files that record every detail of what you are witnessing. These files retain far more information than JPEGs, which compress digital photos by blurring some important details. You will need more memory and storage as these consume a lot of both, but your images will capture much more, if not all, of the detail within Antelope Canyon that you can see with your own eyes.
Take lots and lots of pictures
This may seem obvious and self-explanatory, but reservations for Lower Antelope Canyon are often made several months in advance – especially during peak season and holidays. Which means once you finish your guided tour you may not be back for quite awhile, even if you really want to.
If you take hundreds of photos, and pay attention to the tips in this article, it is near impossible to not come out of your tour with at least one or two amazing photos that you can’t wait to post to social media.
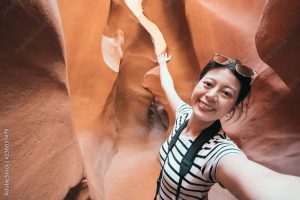
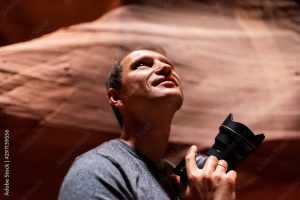
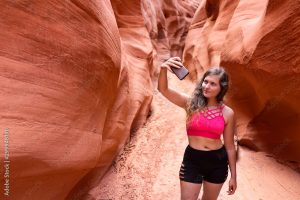
Taking that perfect selfie
While taking amazing photos of the incredible sandstone walls, ridges and passageways of Antelope Canyon, it’s sometimes easy to forget the most important part – you! After all, how else are you going to show that you were actually there, standing in the middle of the famous natural wonder, and not just posting someone else’s professional photo?
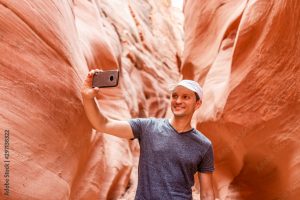
First and foremost, don’t hold the camera too close to your face. This will always lead to some sort of lens distortion, and likely not a particularly flattering one. For example, lens distortion can make your nostrils bigger or exaggerate circles under your eyes.
But keeping the camera a little further away will produce a more natural-looking photo. One that captures your proper dimensions, facial features and maintains proper lighting.
Secondly, there isn’t one universal standard when it comes to how to hold your phone, however there’s a few tips you can use to keep the camera or smartphone steady.
However, some smartphones allow you to use the volume button to capture a photo. If you find yourself moving or twisting too much to try and hit the capture button on the screen, try the volume button on the side of the phone instead. It might be much easier, and will keep you from dropping (and potentially breaking or losing) your phone.
Also, try to keep your camera at slightly above eye-level. A higher angle tends to give the slight illusion of a longer neck and more flattering jawline, not to mention capture your eyes more fully – which professional photographers will often tell you is the most important thing to do for a portrait.
As we’ve noted previously, the natural sunlight of Antelope Canyon is the most important factor when taking that perfect photo. But that doesn’t mean standing directly in it.
Having the sun directly above you can lead to what’s often referred to as “racoon eyes,” where shadows form around your eyes due to the sunlight beating down on top of your head. Instead, find one of the many shaded areas on the floor of Antelope Canyon. Taking photos from there will reduce the intensity of the direct sunlight, and draw favorable contrasts that bring out the rugged details and natural colors of both you and the canyon.
Now that you have the right grip, right distance and right angle for your selfie, feel free to play around a little to get different points of view. Move your arms slowly to the left or right as you take pictures. Crouch down, stand on your tippy toes, whatever feels right. And of course don’t forget to smile, strike a pose or act as though you are fixated by the natural wonder and beauty of Antelope Canyon that is all around you.
Remember that not all selfies have to be ones in which you are simply smiling at the camera. Candid shots – particularly those that capture someone’s genuine reaction to the beauty of the slot canyon, or looking up at the sky from the canyon’s floor, can be even better.
Think about it. Wherever you go, whenever you travel and take photos, you take pictures smiling at the camera – usually with the exact same expression. Taking those same types of pictures could give the impression (to those that have seen your countless other vacation photos) that Lower Antelope Canyon was just another stop, just another place you visited. Another box checked. Candid pictures, capturing the awe and wonder so many feel when touring Antelope Canyon, can make those photos all the more memorable.
Finally, look to your fellow tourists! You will likely have your guided tour of Antelope Canyon with people that have come from all over the world. People with different languages, customs- and ideas on how to get that perfect shot. Don’t be afraid to be nosy. See what others are doing, what ideas they come up with. You may learn something about photography you never knew before, and get a better photo out of it than you thought possible.
Of course, some of the most knowledgeable people you will ever meet on how to take the perfect Antelope Canyon picture will be walking right besides you. The Navajo tour guides for your adventure are not only incredibly well-versed on Navajo culture and tradition, and the history and significance of Antelope Canyon itself, but they have helped hundreds – if not thousands – of tourists take their photos along the way.
They know everything there is to know about Antelope Canyon – every angle, every crevasse, every shadow, not to mention the perfect time, place and angle to get that one amazing shot. They are there for you, to make sure you have the best experience possible, so don’t be afraid to ask them for their help. They may be able to get you that one perfect photo you came here for, the one that you can load to social media and show off to your friends when you get back, or frame to hang in your home or office.
And that’s about all there is to know! We look forward to seeing you at Lower Antelope Canyon – and seeing what you can do with your camera or smartphone – sometime in 2023.